Thursday, July 15, 2021

Ranchos - Mamones de Almidón, a Pinedo recipe

I've been translating Encarnación Pinedo's 1898 cookbook, El cocinero español.   

One category that caught my attention was called "Ante."  Now that means "before", so I took it to mean it was an appetizer or a first course.  But the recipes described a dessert, and that confused me.  Seven of the eight recipes called for fruit cooked into a thick syrup and put into layers with an ingredient called "mamón".  The eighth called for "bizcocho", which is a biscuit.  I believed from this that mamón was bread or cake.  

A look around the internet first seemed that my hunch was right.  I found a recipe for a chiffon cake called mamon, but it was from the Philippines, and I wasn't sure it was the same thing.  Digging some more, I found that mamón could refer to the Spanish lime, which is like a cross between a lychee and a lime.  It is a fruit that people mostly eat fresh, although it is popular as a juice.  Looking hard at the recipes, I tried to imagine a first course refreshing beverage made with slices of Spanish limes.

But that just didn't seem right. Miss Pinedo lived in Northern California, and Spanish limes don't grow there.  They could have been shipped but the recipes just seem to point to a cake.

I set that question aside and continued to read.  And, guess what?  I found a whole section on mamones much later on in the book.  Yes, I was right, they are cakes or rolls, sweetened and sometimes flavored with anise or sweet almonds.  The word "mamón" means "sucker", because sometimes they are moistened with a sugar syrup which they "suck up" or absorb.  Another name for the mamón is "marquesote", and you can click here to read more about it. (This site is in Spanish but Google will translate it into English.)

To make an ante I needed to first make a mamón, and that is what this post is about.  Come back again for the next post, which will be about the ante.

Here is Miss Pinedo's recipe, as found on page 153 of her book.

Mamones de almidón.

Se baten veinte y cuatro huevos, separadas las claras de las yemas, hasta que se pongan duras.

Aparte se mezclan con las claras dos pozuelos de azúcar en polvo, y estando bien incorporada, se le añadirán las yemas, revolviendo todo cerca de la estufa, vaciando en el batido diez y ocho onzas de almidón de maíz: se seguirá batiendo con una mano mientras se le pone con la otra el almidón, para que no forme granos. Tan luego como todo esté incorporado, se vaciará prontamente en las cajas, que solo se llenarán hasta la mitad para ponerlas á cocer en un horno suave.


Starch Mamones

Twenty-four eggs are beaten, the whites separated from the yolks, until they get hard.

In addition, two cups of powdered sugar are mixed with the whites, and then the yolks are well incorporated, stirring everything near the stove, then empty into the batter eighteen ounces cornstarch:  continue beating with one hand while putting the starch in with the other, so that it does not form lumps.   As soon as everything is incorporated, it will be promptly emptied into the boxes, which will only be filled halfway; put them to cook in a soft oven.


My Notes

I didn't know this technique, so I looked around the internet.  Click here to see the video that helped me understand what to do.  I used the quantities in this video so I didn't have to use 24 eggs.  Note that I used powdered sugar as Miss Pinedo specified.

Redaction

5 eggs, separated

300 grams cornstarch

180 grams powdered sugar

Preheat the oven to 300 degrees F.

Beat the egg whites until stiff.

Add the powdered sugar in batches and mix it well into the egg whites, using a low speed on the mixer and stopping the scrape the sides as needed.  

Add the yolks, one at a time, incorporating each one well before adding the next.

Then add the cornstarch, a big spoonful at a time, incorporating it well before adding the next and stopping to scrape the sides as needed.

Once the batter is done, pour it into pans.  I chose to use four tiny loaf pans because I thought that shape would be best for the ante.  Each pan was ungreased and filled about halfway.

The pans went onto a bigger pan so they could all be handled at once.  

They baked for 40 minutes, until a pick inserted into the middle came out clean.

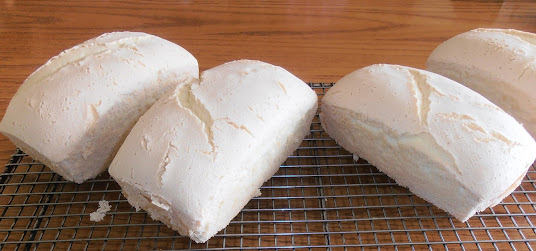
I let them cool in their pans on a wire rack until I could easily hold them, then I slid a spatula around the sides.  They all popped out easily.  They finished cooling on the rack.
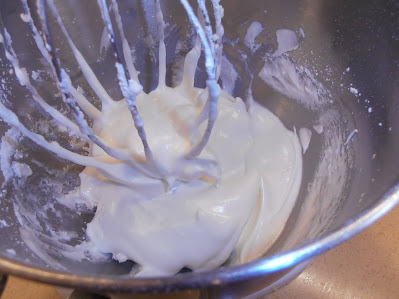
Egg whites plus powdered sugar

And now with the yolks

The batter has the cornstarch and the pans are half full.

Fresh out of the oven!

Final cooling

A close up.

The Verdict

I sliced one loaf into 1/2 inch wide pieces lengthwise.  The texture was perfect:  uniformly tiny holes, no part was too dry or too wet.  The exterior was just a little darker than the interior -- not over- or undercooked.

I tasted one.  As a cake, it left something to be desired.  The mouthfeel was more pasty than I expected, and rather dry, and the flavor was almost not there.  I suppose that was to be expected as it was just cornstarch, sugar, and eggs.  I think my mouth was expecting a moist piece of cake and this wasn't it.

But I knew how it was to be handled for the ante, so I consider it a success.  Tune in to the next post to see how the ante turned out.


Thursday, July 1, 2021

Ranchos - Manchamanteles, a Pinedo recipe

My first recipe for the Ranchos era is Manchamantel, "stains the tablecloth".  Ms. Pinedo's book lists two recipes, this one and one that uses chicken, pineapple, and peaches (both on page 157).  (See details about her book here.)

A translation of the second recipe is at the bottom of this post.

I used Dan Strehl's translation from page 108 of Encarnación's Kitchen which he titles "Manchamanteles, The Stew that Stains the Tablecloth":

ISBN 0-520-23651-3
Manchamanteles  -- The Stew That Stains the Tablecloth
Take some ripe tomatoes and remove the seeds.  Grind them with soaked, toasted dry chiles, cinnamon, and pepper.  After they are ground, fry in lard, mix with warm water, and add chickens or pork, cooked sausages, olives, vinegar, salt, a lump of sugar, yams, or peanuts.


My Redaction

2 ounces dried California type chiles
2 pounds, 9 ounces Roma tomatoes
1 scant teaspoon peppercorns
2 teaspoons ground cinnamon
4 ounces beef chorizo
1 pound, 6 ounces braised boneless pork
1 pound, 2 ounces yam
1/2 cup chopped peanuts, roasted and lightly salted
1 tablespoon sugar
1 tablespoon apple cider vinegar
1 teaspoon salt
1 cup chopped black olives

And the chiles.  See below.

My Notes

The tomatoes, chiles, pepper, and cinnamon form the sauce in which all the other ingredients simmer to make the stew.  My challenge was learning how to handle the chiles.

You can read the details of how I chose my chiles here.

And the details of how I prepared them for this sauce are found here.

While the chiles soaked, I prepared the rest of the ingredients.

I removed the stems and seeds of the tomatoes and cut them into big pieces.  Then I processed them in the blender to make four cups of puree.


Once the chiles were ready, I put them into the blender along with some of the tomato puree and the cinnamon and pepper.  I blended them until the mixture was smooth.  I poured some of it out and added in the rest of the tomato puree so it was all well mixed.  The taste was of raw tomato with a mild chile bite.  I could taste the spices but they weren't overwhelming.  

The sauce went into my Dutch oven that was heated and had about 1 tablespoon olive oil in it (I was out of lard).


I decided that "frying it in lard" really meant to heat the sauce and cook it a little before the other ingredients went in.  I brought it to bubbling over medium heat and then let it simmer over a lower heat for 10 minutes, stirring occasionally.

The braised pork chunk was cut into bite-sized cubes, the yam was peeled and diced, the chorizo was cooked in the skillet and then drained of its fat.  The whole olives were sliced and the peanuts were coarsely chopped.  

Once the sauce was ready, all the other ingredients were added and the mixture was stirred.  It looked too thick so I added a little hot water so it stirred easily.

I adjusted the heat to low, covered the pot, and let it simmer for about an hour, which is what it took to make the yam cubes soft.  Occasionally I stirred it.

The Verdict

I served it with a garnish of chopped peanuts and with warm flour tortillas on the side.

My guest taster and I were a little wary because neither of us are experienced hot chile eaters.  We both knew - intellectually - that I had chosen mild chiles but the chorizo certainly had a kick.  

So we took experimental bites and were pleasantly surprised at the flavor.  The chile heat was mild enough for us but it was there.  The pepper and especially the cinnamon were good background support flavors.  The chunks of ingredients -- pork, yams, olives, and peanuts -- were tender and had absorbed enough of the sauce flavors to be interesting.  The yams came across as slightly sweet.  The raw tomato taste was gone and the spices and other flavors had blended into a nice balance.

The sauce itself had a light sweetness to it, which we enjoyed.  We both decided it needed more vinegar, although we liked it as it was, too.  We ended up putting some aged balsamic vinegar on top and that was wonderful.  I think I would increase the apple cider vinegar to 2 tablespoons and perhaps put the second tablespoon in just before serving it.

The flour tortillas were a good accompaniment and actually the historically correct choice.  Ms. Pinedo lived in Northern California where it was easier to grow wheat than corn.  We each tore off pieces of the tortilla and spooned the stew onto it.  

Success!  I was pleased I handled processing the chiles well and that I didn't blast out our taste buds with too much heat.  If you want more heat, you could use the entire 9 ounce roll of chorizo or you could choose hotter dried chiles, like a pasilla ancho or more.  I bought some pasilla anchos for more experimenting.

For the record, my table did not have a tablecloth, so it was not stained.   


We had the leftovers the next day and found it was even better.  No more vinegar was needed; all the flavors had melded and balanced.  It was excellent.


Here is the translation of the second recipe, "Manchamanteles de gallina":


Chicken Stain the Tablecloth

A wide chili is deveined and toasted, then cooked, soaked, and ground with garlic, cumin and tomatoes. This is half fried in little lard and then mixed with cooked onions, pineapple, sweet potato, peaches and chopped peanuts.

(I assume you would add pieces of chicken with the onions and etc.)


Sunday, June 20, 2021

Ranchos - El Cocinero Español, "The Spanish Cook"

The Berryessa family was a prominent Californio family during the Spanish and Mexican periods of California history.  They held extensive rancho grants.  Sadly, the family lost much of what they had once the Gold Rush started due to the murder of family members, and crooked lawyers, squatters, and other unscrupulous characters.  (See Wikipedia:  "Berryessa family of California")

Encarnación Pinedo was born on May 21, 1848, the daughter of a Berryessa, in the Santa Clara Valley of Northern California.  Note that she was born at the beginning of the Gold Rush, which was the end of the Mexican or Rancho period.  However, she was raised in the Rancho culture.  Ms. Pinedo became an accomplished cook and decided, at the age of 50, to publish the recipes she had learned and developed over her lifetime.

That book, El Cocinero Español, "The Spanish Cook," written in Spanish and published in 1898, contained over 800 recipes that she dedicated to her nieces:  "Para que siempre tengan presente el mérito que tiene el trabajo de una mujer y estudien el contenido de este volumen", "So that you may always remember the value of a woman's work, study this volume's contents."  You can find a copy of her book in Spanish here.

I have a copy of Encarnación's Kitchen, translated and edited by Dan Strehl, which contains about 300 of Ms. Pinedo's recipes.  (Pinedo, Encarnación.  Encarnación's Kitchen: Mexican Recipes from Nineteenth-Century California.  Dan Strehl, editor and translator.  University of California Press.  Berkeley, CA.  2003)  

ISBN 0-520-23651-3

Pages 1 through 15 contain an essay by Victor Valle that puts Ms. Pinedo's work into historical context:

Pinedo's Cocinero documents the start of California's love affair with fruits and vegetables, fresh edible flowers and herbs, aggressive spicing, and grilling over native wood fires.  Her book also gives us California's first major collection of Mexican recipes... (page 1)

Pinedo and her book stand out in a time and place where men dominated the world of letters, and those letters were published in English.  She was among that handful of nineteenth-century Latinas who published their works in the period following the conquest of Alta California.  (page 2)

Mr. Strehl emphasizes this in his introduction:

The first cookbook written by a Hispanic in the United States, it was also the first recipe-specific recording of Californio food, Mexican cuisine as prepared by Spanish-speaking peoples born in California. ... Her book gives us the first and only contemporary account of how Mexican food was prepared in California during the nineteenth century.  (page 19) 

Pinedo's book was one of the largest and most comprehensive works printed in nineteenth-century California.  Her liberal use of spices, chiles, vinegars, and wines provided a striking flavor contrast to the bland recipes offered by other texts [of recipes published in California in that century]. (page 27)

Pinedo filled her book with a remarkable variety of recipes from the Hispanic, French, and Italian traditions, as well as recipes of her own invention.  From the recipes in her book, it is clear that Pinedo was a sophisticated and knowledgeable cook, comfortable in many styles.  ... It is clear that Pinedo saw her book as an explicit document of cultural transmission, designed to save her culture for her nieces, who were growing up in an Anglo household.  (page 31)

Encarnación's food was the food of Mexico, brought to California by early settlers and maintained by subsequent contact with central Mexico, through either personal connections or literary transmission. ... While her cuisine is more directly Mexican, it adapted well to local ingredients.  As California became "American" in the period from the 1850s to the 1890s, additional ingredients from the Anglo kitchen became available.  The sophisticated food markets of San Francisco were also within easy reach ... She also calls for a number of ingredients not commonly available today. (page 35)

This recipe collection is considered by culinary historians as representative of rancho or Californio cooking.  Yes, she was born at the beginning of the Gold Rush period, but she "lived close enough to her past to invoke its presence, and long enough to see its decline."  (Valle's essay, page 7)  She pointedly rejected Yankee recipes and claimed, "there is not a single Englishman who can cook, as their foods and style of seasoning are the most insipid and tasteless that one can imagine."  (page 9)

It is my intent to explore the recipes of Ms. Pinedo's work and document them on this blog to show what rancho cooking could have been like.


Tuesday, June 15, 2021

Ranchos - Preparing Chiles

I have been reading through Jacqueline Higuera McMahan's book, California Rancho Cooking and also Encarnación's Kitchen, Dan Strehl's translation of the quintessential Californio/Rancho cookbook published in 1898 by Encarnación Pinedo titled La Cocina Español, "The Spanish Cook."  Published in Spanish, it is the earliest known collection of Californio recipes.  Encarnación's Kitchen contains a  sampling of the more than 800 recipes Ms. Pinedo published, and I have to admit that many of them look really good.

Both books emphasize the use of chiles.  In particular, the use of dried chiles in sauces.  As I mentioned in a previous post, "Ranchos -- Choosing Chiles", I am a "chile-cooking newbie" and realized I needed guidance on properly preparing them.

Many of Ms. Pinedo's instructions are "grind dried, toasted chiles" with other ingredients.  I had to wonder how I was supposed to toast dried chiles.  What is the technique?  What is the goal?

Ms. McMahan's book provided me with the initial instructions on page 121:  "Toast the chiles on a griddle or in a heavy cast iron pan.  Keep turning so they soften, but do not burn."  FineCooking.com's article, "How to Toast Dry Chile and Spices" added more details:

Heat a heavy-duty skillet (such as cast iron) over medium-high heat until you can feel the heat radiate from the surface. Working with one type of spice or chile at a time, add it to the skillet. Flip or stir frequently for even toasting, until browned for spices or lightly charred—not scorched—for chiles. Immediately transfer to a cool container.

FineCooking also suggests to vent the fumes well because "chile smoke is irritating and may cause you to cough and sneeze."  

Now I knew what to do and what to look for.  I opened my bag of dried California chiles (considered mild for my inexperienced palate) and heated up my heavy cast iron skillet.  

Right out of the bag.  The red highlights don't show well here.

Once the pan was radiantly hot, I placed one chile on it and watched it carefully as I turned it over again and again with tongs.  I noticed that the chile right out of the package was stiff and dry and flat.  Once it was on the heat, it became obviously softer and flexible.  After it was on the heat longer, the chile started to puff up.  

Out of the bag:  flat and stiff

Puffy from the heat

Puffed and toasted

It was hard to tell if the chile was toasting or not -- it started off dark with some red highlights.  I thought I saw some dark brown spots but wasn't sure they were new.  But it puffed and I decided it was done toasting, so I put it on a plate and got another chile.

Once I had toasted several individually, I started recognizing the changes of color:  the surfaces that were in contact with the skillet became darker and looked a little crispy.  I felt more confident about my timing.  I began to toast two and even three at a time, turning them often and taking them off the skillet when they puffed and looked darker.  One smaller chile with the stem fully intact puffed so much that it popped.

I toasted the entire 3 ounce bag.  A few little pieces of chile ended up in the pan and appeared to be scorched, which helped me realize that I hadn't scorched any of the chiles that I was toasting.  And while I had the venting fan on over the stove top, I did not encounter any fumes or smoke that bothered me. 


The next step for preparation was soaking.  Ms. McMahan gives more instruction on page 121:  "Rinse well to remove all the dust and grit.  Break each chile into two or three pieces, removing stems and seeds.  Place in a large bowl and cover with boiling water.  Soak for 1 – 2 hours."

I decided to soak 2 ounces of my toasted chiles.  At first I wasn't sure how to remove the seeds.  The chiles had cooled so they were stiff again instead of pliable.  I broke the top off that contained the stem and noticed that many seeds were there.  I tried using a little spoon to scrape out the seeds but that meant I had to break the chile into bits in order to get the spoon inside.  

Then it occurred to me that since I needed to rinse the "dust and grit", I could use water to help rinse out the seeds.  What ended up working was breaking the chiles open, using my fingers to pull out most of the seeds and the veins, then rinsing out the rest of the seeds.

The chiles went into a bowl and were covered with boiling water.  I let them soak for one hour and a little more.

After a little soaking time

The soaked chiles were then drained.  I noticed they were soft, pliable, and smelled good.
Drained, softened, and ready to go.

There were still a few seeds among the pieces but I didn't worry about them.

At this point, the chiles were prepared and ready to be used in a recipe.  Their use is for another post.


Thursday, June 10, 2021

Ranchos - Choosing Chiles

I have lived in Southern California for most of my life, so I already knew something about chiles, but I have to admit that I don't cook with them often, so I don't know much about how to prepare them or use them.

One aspect I feel the need to point out is the spelling.  "Chili" is a stew-like dish that is typically tomato-based, often with beans and/or meat, with a dominant flavoring that comes from "chili powder."   This is a spice blend, containing ingredients like onion powder, garlic powder, paprika, oregano, cumin, and some cayenne pepper for "heat."  (Reference:  Chili Powder)  I like to put in sauteed onions, corn, and bump up the umami levels with cocoa powder.  

A "chile" is the fruit of the plants in the Capsicum genus, which are well-known for their hot, spicy taste.  Wikipedia says they are one of the oldest cultivated crops in America, having been part of the human diet since about 7,500 BC.  They all originated in the New World, but they are grown worldwide today.  Other names are "chili pepper", "chilli", "chile pepper", "chilli pepper."  (Wikipedia, "Chili pepper")  And, of course, "Chile" is the country located in South America.  

For clarity, I will make it a habit to refer to the stew as "chili" and the fruit as "chile."  

I needed to learn about how chiles were used during the Rancho period, so I turned to Jacqueline Higuera McMahan's book, California Rancho Cooking(McMahan, Jacqueline Higuera.  California Rancho Cooking. The Olive Press. Lake Hughes, CA. 1983)

ISBN 0-9612150-0-3

Ms. McMahan is a descendent of the Berryessa family, original settlers of the Santa Clara area in Northern California and considered a prominent Californio family. (Wikipedia, "Berryessa family of California")  Her book contains recipes she learned from her Californio ancestors as well as stories of her time at the family rancho.

She gives this insight: 

The original settlement of California was the unrivaled civilizing center for a coastline stretching a thousand miles.  At the heart of the early cuisine were chiles, part of the culinary treasure borrowed from the ancient Indian culture of Mexico.  They simply could not live without chiles and so chiles found their way into many dishes. (pg. 95)

Although chiles were the mainstay of this wilderness diet in Early California, foods advanced, … but the red chile puree remained a staple in all rancho kitchens to be kept on hand for making sauces, enchiladas, carne con chile, beef tamales and other traditional foods.  (pg. 96)

She also provides guidance for selecting and preparing chiles.

Many of the traditional dishes require various types of the red, dried chiles and you must familiarize yourself with some of the most frequently used so you are not at the complete mercy of their whimsical identification in the different ethnic areas of the United States. (pg. 96)

I took excerpts from pages 97-98 to identify which types to purchase:

Distinguishing Types of Dried Red Chiles

California or Anaheim

Pale red with a smooth, shiny skin. … These long, pointed chiles, popularly known as “red chiles”, are the dried version of the green California or anaheim.

New Mexico

… similar to the Anaheim or California chile, except it hotter.  It is difficult to distinguish between the California and New Mexico chile, but the New Mexico seems to have a more brittle, papery skin.

Ancho or Pasilla

Deep red-brown with a wrinkled, dusty appearance.  These are the dried version of the poblano chiles, known in California as the pasilla chiles.  Mild to medium picante.  They may also be called pasilla anchos in some markets.

Japonés

These are ripened, dried serrano chiles.  Very hot.

Pasilla Negro or Pasilla

About 6 inches long and 1 inch wide.  These chiles are long, slender and almost black, giving the characteristic, almost black ochre color to traditional mole poblano of Mexico.

Mulato

This chile is the same shape as the pasilla ancho and it is difficult to tell them apart unless they are side by side, but the mulato is the darker brown, rather than the dark red of the pasilla ancho.

Considering I am a chile-cooking "newbie" and one whose taste buds prefer flavor over fire, I decided to start with California chile with possibly enhancing the heat levels by including some pasilla anchos, depending on what I can find in the stores.  I know I can enjoy the green anaheim chiles without worrying about the heat, so my hope is this will be a good introductory chile.

Saturday, June 5, 2021

Ranchos - Introduction


James Walker, Vaqueros in a Horse Corral, oil painting

The first major effort by Europeans to settle the Pacific coast was the Spanish establishment of the missions from 1769 to 1822.   They also established presidios to provide protection against foreigners and pueblos to help provide agricultural products to the presidios and build the Spanish population. 

Settlers were given land, and ships brought supplies to support these groups.  These changes introduced European fruits and vegetables, brought cattle and horses, and trained the Native Americans in agricultural practices and European cooking techniques.

After Mexico gained its independence from Spain, the Mexican period of California began. 

Supply ships stopped coming altogether but the ports opened up to foreign trade, and because custom duties were so high, smuggling was common. 

Starting in 1833 the missions were secularized – they were broken up and their resources (land, cattle, and equipment) were to be distributed primarily to the Native American neophytes, although that didn’t happen the way it was ordered. 

Often the land was offered for sale to citizens and some was given to the military.  It was also was given as land grants to Californios:  Spanish-speaking people who already lived in California.   These ranchos were permanent grants and big enough to allow the recipients to focus on raising cattle and sheep.   Native Americans who were trained by the missions were hired for their agricultural skills.

The ranchos, the people who ran them, and the culture they created defined the Mexican period enough to also call it the Rancho period.  It spans 1821 to 1848, from Mexican independence to the start of the Gold Rush. 


My Intent

In my exploration of the foods of the Rancho period, I hope to find records of what people had, what was imported, and how it was fixed.  For example, Richard Henry Dana, Jr. wrote about food he had in Monterey in 1842 and San Diego in 1847. 

One resource I have started exploring already is a cookbook written by Encarnación Pinedo.  Although she was born in 1848, at the end of the Rancho period, and her book was published in 1898, she was a child of a prominent Californio family in Northern California and raised in its culture.  She wrote her book to preserve that heritage for her nieces, who were being raised in an Anglo household. 

Miss Pinedo’s book, El cocinero español, “The Spanish Cook”, is the only known collection of Rancho recipes and considered an important resource of the period.  I am translating it and trying some of the recipes.


Tuesday, June 1, 2021

Inaugural Post - Starting Up and Setting Goals


Welcome!

Picture credit:  Rancho Buena Vista Adobe in Vista, California

I was attending a dinner and presentation at the Los Angeles Corral of Westerners and visiting with the people at my table.  In the course of the discussion, I revealed that I maintained a food blog, Goode Eates, where I explore historical recipes and cooking techniques.  GT, a member of the Westerners and an interesting person to talk to, brought up an intriguing idea:  Why not give a presentation myself on California food history?  He thought it was a topic that the Corral would like to see.

At first I deferred.  I have a lot on my plate, so to speak, and taking on another project seemed overwhelming.  And this was true for a while.  Then a pandemic hit and, while I was still busy, I had more time to consider the suggestion.  Specifically, I started looking for resources to see if I could do this project at all and if I could find enough to do it well.

Enter ACWB, my friend with an amazing library of California history books.  When I brought up the project idea, he immediately pulled a large stack of books that contained good support as well as background information.  When I included books that I had in my own cookbook library, I realized I had a pathway to success.  

What has resulted is this blog, whose purposes are to help me document what I am learning as I am learning it and to give me the opportunity to then organize that work for a future presentation, if the opportunity presents.  

Please join me as I wander in and out of various eras of California history, learning about the foodstuffs and recipes, the people and cultures, and trying what I can when I can find the ingredients.  Use the organizing tabs under the main heading if you have a specific interest or just peruse the posts in the order they appear.  Leave me comments, suggestions, ideas, or references if you have them.  

So here's to you, GT.  You get the credit and blame for starting this project.  And to you, ACWB, my unending thanks and appreciation for the support, explanations, patience, and the cheerleading.