Showing posts with label Pinedo. Show all posts

Sunday, May 1, 2022

Ranchos - Mermelada de manzana, Apple Jam, a Pinedo recipe

It is spring time and my orange tree is full of fruit.  My Pakistani mulberry is producing well this year.  Other plants in my yard are leafing out and I know they will have fruit on them in a few months.  Fruit!  I'm so excited about it!

So that is what I was looking for when I skimmed over the Pinedo recipes.  I wanted to make something with fruit in it. (In case you don't know what I mean by the Pinedo recipes, do a search on this blog for the keyword "Pinedo.")

Many of her fruit recipes involved sugar, and lots of it.  Of course -- she was putting up jellies, jams, and other preserves to last the year, and she did not have refrigeration.  But as much as I love sweet food, I really like to let the flavor of the fruit come through.  This is why I don't can my fruit preserves, but I do like to freeze them.  Last week I made a mulberry and apple spread that had just a little sugar, a splash of lime juice, and a bit of cardamom to deepen the flavor.  It was lovely, especially as a side condiment to some grilled pork chops.

What I chose to make was her apple jam because it looked more like a chutney or compote than just jam, and it didn't have as much sugar as many of her other recipes.  There are a few recipes with the same title, and this one is on pages 162 - 163.


My Translation:

Apple jam.

         Six large, sour apples, chopped; two tablespoons of very fresh butter. If the apple is too dry, add four tablespoons of fresh water.

         When the apple is soft, add two cups of sugar, half a cup of honey, a cup of citron, two teaspoons of vinegar, the juice of two oranges and part of the yellow rind, a cup of raisins and another of currant, two teaspoons of cinnamon, a teaspoon of cloves, two teaspoons of pepper and a teaspoon of nutmeg.


Use one lemon

Ingredients as a list

6 large green apples

2 tablespoons butter

2 cups sugar

1/2 cup honey

1 cup citron (I used the zest of 2 lemons instead.  You might want to use less.)

2 teaspoons vinegar (I used apple cider vinegar)

juice from 2 medium oranges, and the zest from one

1 cup raisins

1 cup currants

2 teaspoons cinnamon

1 teaspoon cloves (I suggest less)

2 teaspoons pepper

1 teaspoon nutmeg


My Notes

My apples were not dry, so I did not add any water.  I started the butter melting in a big Dutch oven, then started coring and chopping the apples.  They were not peeled.  As soon as I chopped 1/4 of an apple, the pieces went into the butter to start sautéing.  Every time I added more, I stirred what was in the pot.

Once all the apples were tender, I added the other ingredients.

It is the wrong time of year to get citron, so I chose to use fresh lemon zest that was finely chopped.  I also shredded and chopped the orange zest.

Once the other ingredients were mixed well, I brought them just to a boil, then lowered the heat so they simmered.

I let uncovered pot simmer with an occasional stirring until the mixture was thick and starting to look a little dry.


Then I let it cool for a taste test.

The Verdict

Whoooo!  It is spicy!  I was a little worried that 1 teaspoon of cloves would be too much, and I think my worries were justified.  I think 1/4 to 1/2 teaspoon would have been better because the cloves really dominate the flavor profile.

Also, the flavors hadn't really blended much.  The lemon zest was still somewhat uncooked, and I did not like how I kept getting a chewy bite of it.  Basically, the whole mixture seemed like it needed more cooking.

So I added about 1 cup of water, stirred it in well, then got the mixture back to a simmer.  This time I put the lid on.  I let it simmer about 40 minutes more, stirring it sometimes and checking to see if the lemon zest was cooked all the way.

It was much better!  The zest was more subtle, the flavors more blended.  The cloves were still too much but they weren't off-putting.

My guest taster and I both had a small bowlful and accompanied it with a small glass of chardonnay.  Neither of us were very hungry, and this made a perfect little snack.  

It was spicy, sweet, fruity, savory (from the pepper, I think), tart, and floral from the two citrus zests.  I would love to have it as a condiment next to roast meat.  We also both agreed it would be a great topping on a scoop of quality French vanilla ice cream.  Success!

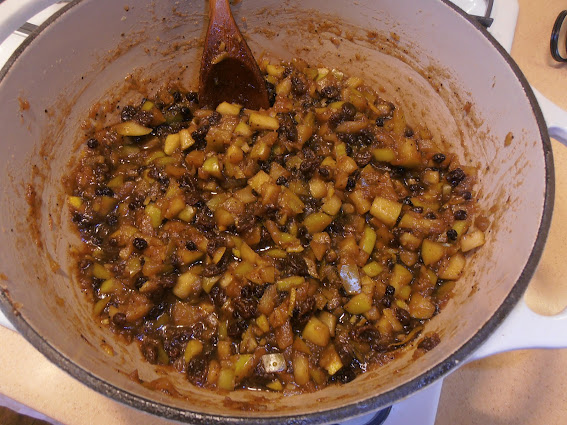
You can see that it is truly like a chutney (without the nuts) or a compote in that the individual chunks of fruit are still there.  Nothing went to a puree like in a regular jam, and the chunks were more dominant than what we typically see in a marmalade.

Miss Pinedo's recipe did not make the great quantity that is usual for when someone wants to can the results.  I think this is just the right amount to put out for a large gathering, like for a barbeque or picnic or potluck.  

This is a keeper, although I strongly recommend cutting back on the cloves and using the zest from one lemon.


Tuesday, February 15, 2022

Ranchos - Tamales al Vapor, part 2 (masa, assembly, and finale), a Pinedo recipe

In the previous post (click here to see it), guest cook NH and I made the sauce and filling (stew) for Miss Pinedo's Tamales al Vapor, Steamed Tamales.  In this post, we make the masa and assemble the tamale.  Finally, we cook and taste it.

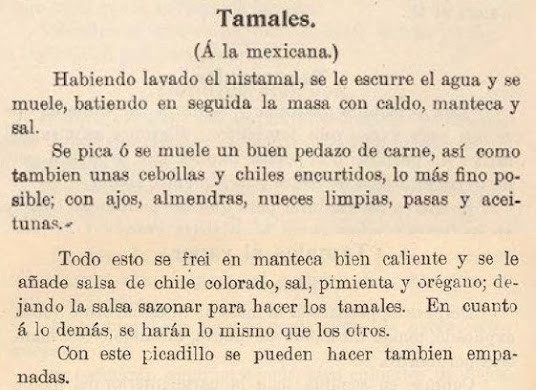
We returned to this recipe for beef tamales to get instruction on making the masa.


My translation
We focused on the instructions:

The corn paste is whipped with the meat broth, adding more fat, salt and one or two tablespoons of yeast powder if you like.

The paste must be beaten well before making the tamales.

Yeast powder is baking powder, and I chose not to use it.

In other recipes, Miss Pinedo notes that beating the masa a long time, "until it blisters" or has bubbles pop on the surface, makes a more tender masa.  The goal is to have a very smooth mixture that is not sticky or greasy.

The bag of masa or finely ground nixtamalized corn that I purchased suggested the ratios to work with.  We used 

4 cups masa flour
3 cups broth the chicken meat was parboiled in
about 1/2 cup melted vegetable shortening
about 1/2 teaspoon salt

First the flour and broth were put in the mixer.  The broth was splashed in and mixed a little at a time, turning the mixer on and off as needed to mix without kicking the flour out of the bowl.  Once the flour was moist enough to start holding together, the mixer was left on.  The shortening was melted and the salt was added to it.  This was beaten into the flour mixture in small amounts.  I stopped adding it when the whole mixture came together and felt smooth and not sticky.

Note:  I think the salt should have been added to the flour mixture before the shortening was added.  The bag said to put it into the melted fat but since salt doesn't dissolve in fat, it was hard to get it out of the pan.

Then I left the mixer running for another 5 minutes or so.  I didn't see blisters but the masa looked fluffy.

(Later note:  I made more masa, used about 3/4 cup shortening, and got a better result when I steamed the tamales.  More shortening seemed to hold more air in the mixture and the longer beating helped get that air into it.)

Now we were ready to use the main recipe on page 163:  The Latest Novelty!

My translation

Not everyone has a pudding mold on hand in their kitchen.  Not even me!  This is what one looks like:

Antique pudding mold with lid.  Note the hole in the pan's center.

Assembled and ready for cooking.

The idea is that you fill the mold with your pudding, twist the lid on tightly, and place in a larger pan with hot water.  The larger pan is covered and put over heat, surrounding the mold with steam for a few hours.  This cooks the pudding.  The lid keeps the steam from contacting the pudding directly so it doesn't get soggy.

My modern adaptation was to use a tube pan, although a Bundt pan would also work.  

It doesn't have a lid but I can make one using foil.

Following the instructions, I buttered the pan, then covered the inside with a layer of masa.

I tried to keep the thickness fairly uniform and not too thick.  
Next I put in the stew.
Then I put a layer of masa over the top, making sure to seal the edges where it met the sides of the pan and the tube.  It helped to get my hands a little wet to smooth over the surface.

It didn't occur to me at the time, but I should have used a little extra masa or foil to plug the hole in the tube.

I used a cloth to cover the surface and then foil over the top of that, and placed the whole assembly into the Dutch oven.  There was a small rack below the mold so water could circulate around it.  The water (already heated) came about halfway up the side.  I had extra water heating in the tea kettle just in case I need to replenish.


I used the foil to help hold the cloth up out of the water.

The lid went on the Dutch oven and I turned the heat up until steam was coming out from under the lid.  I turned the heat down so that the water was simmering and just a little steam came out.  

I checked it every 30 minutes but never needed to replenish the water.

After 2 hours, I noticed a lovely corn scent in the steam.  I turned the heat off and let it sit for another 20 minutes or so while I got ready to take it out. 

Here is how it looked when the foil and cloth came off:
This is when I realized I should have plugged the hole.
First we lifted the mold out of the hot water.  Then we put a big plate over the top and worked together to invert it.  Fortunately that all went well and the mold popped off easily.

Right out of the mold!

We were both very happy with the way it looked.  It held together and only had one small crack on the side.

The steamed tamale was served with a tossed green salad and some mild, red salsa on the side.

The Verdict

Four of us gave it a try.  We used a very sharp blade to cut through the masa. 


The pieces were wedge-shaped.  I was pleased the stew was firm enough that it didn't flow out of the crust when the tamale was cut.  It stayed in place.  


It was well received.  The masa was firm, not as tender as I had hoped but certainly acceptable.  It added a nice corn flavor and acted as a background for the stew.  The stew was flavorful with all the complexities of the ingredients:  chicken, olives, nuts, raisins, onions, chiles.  NH noted that the chicken was wonderfully tender.  It was all balanced and tasty.
I liked it both by itself and with a little salsa mixed in.  

We thought it would be improved with more spices in the stew:  more oregano, garlic, and vinegar to spice it "higher", although no one thought it lacking.  What was surprising was that it was not hot from the chiles -- we all expected it.  Perhaps using different chiles would do the trick.  Those of us who are not used to the fire chiles bring to a dish were fine with it as it was.

If I were to do this again, I would probably start with a canned red chile sauce, just to save time.  It took the good part of a day to make this from scratch.  Cutting out several hours to make the sauce would be fine and still make a good dish.

In 1898, this was the latest novelty!  I can see how it would be impressive to dinner guests (as it was to mine.)


Tuesday, February 1, 2022

Ranchos - Tamales al Vapor, part 1 (sauce and filling), a Pinedo recipe

On page 263 of Miss Pinedo's book El cocinero español, she lists "Tamales al vapor" or Steamed Tamales.  Underneath she adds that it is the "latest novelty."  It is a tamale made in a pudding mold and is steamed.  I see the advantage:  instead of wrapping individual tamale servings, you made the whole thing at once to serve a crowd.

I wanted to make it as she might have, starting with dried chiles to make the sauce and working my way through the entire process.

Note that I scheduled an entire day to get it made!  The best part was I had a guest cook, NH, helping me along the way.  

There are a variety of recipes Miss Pinedo offers to use as guides.  I chose this recipe on page 248 for the sauce:


My translation

My Notes

I put a lot of water into my stovetop tea kettle and started heating it.

I used 12 chiles:  6 each of California and Guajillo.  To "decrown" is to remove the stem end; then I split them down a side and removed the seeds (saving some for the sauce) and any loose veins that tore out easily.

Straight out of the bag

Decrowning


Seeds and veins removed.

They went into a 250 degree F oven.  I took them out after 15 minutes because they had puffed and darkened.  

They went into a bowl of ice water for just a few minutes and then the water was drained off.  I put them in a saucepan and poured the hot water from the tea kettle over them, just enough to cover the chiles.  The lid went onto the saucepan and the chiles soaked for two hours.
Beginning of the soaking

After soaking
The water was drained off and the chiles went into the blender.  I added enough water allow the blending to proceed smoothly and I processed them until there were no big pieces but I could see tiny bits of skin.  

NH used the back of a ladle to push the pureed chiles through a coarse sieve, occasionally stopping along the way to remove the bits that didn't go through.  At first it was too thick to push through, so she added enough water to make it workable. What she ended up with was about 1 1/4 cups of chile puree.
Smooth!  No bits.
We then added 1 teaspoon salt, 1 teaspoon dried and crumbled oregano, two tablespoons olive oil, and two tablespoons white wine vinegar.
This was the sauce.  Next we worked on the filling, which Miss Pinedo calls the stew.

I used this recipe on page 262 as our guide:

My translation
I had a big bag of boneless, skinless chicken thighs, so NH cut them into bite-sized pieces.  While she was doing that, I heated up a pan of water with 1 teaspoon salt in it.  

To parboil the chicken pieces, I put a handful in the hot water and stirred it to separate the pieces.  They stayed in the water (with an occasional stir) until the exterior was no longer pink (about 5 minutes per batch).  Then they were removed and drained.  We used about 2 pounds of meat, total.  As each batch finished draining, they went into the chile sauce, which was over a very low heat.

This looked like a good meat-to-sauce ratio.
Next we turned to page 261 and the recipe for beef tamales to continue making the stew.

My translation
We also referenced pages 263 and 264 on Mexican style tamales for more ideas on what to go into the filling.

My translation
We focused on the beef tamale instructions that said:

On the other hand, a lot of onion is chopped and fried in good fat; when it begins to brown, add a tablespoon of dry flour and stir and turn the sauce to prevent the flour from sticking or browning too much. Immediately, a good thick red chile sauce is added; seasoning it with salt, oregano, and some toasted and ground red chile seeds, and olives from Spain. Then place the meat in the sauce, letting it simmer over a slow and prolonged heat until it is well seasoned.

A large onion was diced and fried in olive oil, adding 1 heaping tablespoon of flour once the onions started to brown.  This was stirred a lot until the whole thing looked thick.

Meanwhile, I took the few (2 to 3) tablespoons of chile seeds I had saved and toasted them in dry, hot skillet.  It is important to keep the seeds moving while toasting to avoid scorching.


The time to stop toasting is when many or most are browner and you can smell a toasted scent.


Then they were ground in the little coffee grinder that is used just for spices.

We tasted them.  Surprisingly, they weren't really spicy.  We decided to use them because they might add a toasted flavor and possibly thicken the sauce a little.

The inspiration from the Mexican style recipe was to add garlic (1 tablespoon, chopped), black olives (about 15, chopped), almonds and walnuts (about 1/2 cup total, chopped), and raisins (1 1/2 handfuls).

Once everything was in the sauce, we tasted to adjust the seasoning.  We added another 2 tablespoons of vinegar and 1 teaspoon of salt.  That tasted just right.  We also added some of the broth the chicken was parboiled in to make it moister.

Then we put the stew over a very low heat, covered the pan, and let it cook for an hour or so.  

Done cooking.

This is the end of part one.  Part two is posted next.  This is making the masa and assembling the entire dish.

Summary of what we used for the sauce and filling:

12 chiles
2 lb chicken thigh meat 
olive oil
1 large onion
1 heaping tablespoon flour
15 olives
1/2 cup total chopped almonds and walnuts
1 1/2 handful raisins
1 tablespoon chopped garlic
2 - 3 tablespoons chile seeds
4 tablespoons white wine vinegar
2 teaspoons salt + 1 more teaspoon for the parboiling water
1 teaspoon dried oregano


Saturday, January 15, 2022

Ranchos - Almendras tostadas, Toasted Almonds, a Pinedo recipe

Almonds are used often throughout Miss Pinedo's book and this is not surprising because she lived in Santa Clara county, which is known for its agriculture, including almonds.

UC Davis published "Almond Production in California" by Geisseler and Horwath which states:

Almonds were planted in California as early as 1853. The varieties used were of European origin.

...

In the 1880s, local varieties, more adapted to the climatic conditions, became available and allowed for profitable production of high quality almonds.

...

With adapted varieties available, almond production increased steadily. While the statewide production was about 250 tons in 1888, it averaged 2250 tons between 1910 and 1914 and 4600 tons between 1915 and 1919.

This recipe, on page 28, caught my attention and amused me greatly because of one phrase:  "When the almonds squeak, they are removed from the fire."

I really wanted to try it to see if the almonds would squeak or not.


My translation

My Redaction (first attempt)

1 pound raw almonds, already shelled
1 pound granulated sugar
4 ounces water
1/4  to 1/2 teaspoon lemon extract (see both attempts for comments)


Lightly butter a flat pan or cookie sheet.  Turn oven on to warm or about 170 degrees F.

Put the almonds in a heavy saucepan; add the water and sugar.  Stir well.

Put over medium heat and bring to a boil.  Adjust heat downward as needed to keep the mixture for boiling over.  Do not stir.

When the almonds start to smell toasted, remove from the heat.  Add the extract and stir very well.

Put back over the heat and cook again without stirring until the sugar becomes brown.

Pour the mixture into the buttered pan and quickly spread it so the nuts are a single layer.  Put pan into the oven for about 15 minutes.

Remove from oven and allow to cool.  Break into pieces.

My Notes

I interpreted the instructions to peel and open the almonds as meaning to remove their shells.  My almonds were already shelled so I used them as they came.  Later I came to realize that then instructions probably meant to blanch them and remove their skins ("peel"), then to open the halves.  This is why I did a second attempt.

Really this is an almond brittle.  You don't want to stir the sugar and nut mixture while it is boiling because this might cause it to crystalize instead of turning to a caramel.  This would make it more like candied (sugared) nuts and not a brittle.

Alas, I never heard the almonds squeak.  I kept waiting and then I noticed the lovely toasted almond scent just before I started smelling a scorched odor.  This is when I took the pan off the heat.  So take the pan off as soon as the almonds smell toasted.

I had to guess the amount of lemon extract.  I've had nut brittle with lemon flavoring before (though not from extract) so I knew it would be good; I just didn't want to over- or under-do it.

I didn't need to cook it long the second time to get the caramel color on the sugar.  

After pouring the mixture on the buttered pan, I very quickly spread it to a one-almond thickness.

I'm not sure if the oven drying process contributes anything but I did it anyway.

Here are pictures of the process along the way:

Boiled, not stirred

After the lemon was added.

Poured and spread

A little scorching occurred (see dark spots)

After breaking up

The Verdict  (for the first attempt)

It was very tasty!  The lemon was a nice touch as it kept the flavor from being too sweet.  The caramelization was just right - a good flavor and not sticky (so no risk to my teeth).  The almonds gave it a toasty, nutty flavor.  The scorched areas did not make anything taste bad.

It was at this point I realized I should have skinned and split the nuts.  They were a bit big for each bite, although I didn't have a problem with it.  I also thought that the white almond look would be better, more intriguing, due to the contrast with the brown syrup.  

The Second Attempt

Before following the directions given in the first attempt, pour boiling water over the almonds.  Allow them to sit until cool enough to handle, then remove skins and split the halves or cut the nuts into pieces.

Or just buy blanched, chopped almonds.

My Notes

Some of the nuts had skins that slipped off easily.  Others were stubborn and I had to scrape them off with a fingernail or the edge of a spoon.  This was not easy.  

Also, at first I was trying to separate the halves with my fingers, but this got my fingers sore very quickly.  This is when I started just cutting the nuts into big chunks (two or three per nut).  

Frankly, after doing this for about 4 ounces of almonds, I stopped.  My hands hurt and I hadn't gotten very far.  This is why I recommend buying blanched, chopped almonds.  

Four ounces and the reduced amount of sugar and water cooked too quickly.  Maybe my pan was too big.  When I smelled the slight toasted smell, I removed it from the heat but the mixture started to sugar up.  I added some hot water to dissolve the crystals and to recook it.  It started to sugar again so I added the extract, stirred it, then poured it out on the buttered pan without waiting for the syrup to caramel.

I put in 1/8 teaspoon of extract, so twice what I put in for the first attempt (to match it would have required 1/16 teaspoon for 1/4 the recipe).  Then into the oven.


So I didn't get the color contrast I had hoped for but at least it was a sort of a brittle.

The Verdict (the second attempt)

This was also tasty.  You can see that there was some toasting of the almonds (light brown spots).  If the sugaring hadn't happened, I might have gotten more toasting.

The lemon flavor was more noticeable but still very good.  It is a surprising flavor and compliments the almond and sugar well.  You can choose your preference on this and expect it to be good.