Wednesday, September 15, 2021

Native American - Introduction

Picture credit:  California Intermountain Culture
Their Food Lives in California

Living in a land of great plenty … There is no record of starvation anywhere in Central California.  Even the myths of this area have no reference to starvation.  All around the Ohlones were virtually inexhaustible resources; and for century after century the people went about their daily life secure in the knowledge that they lived in a generous land, a land that would always support them.  Malcolm Margolin, The Ohlone Way - Indian life in the San Francisco-Monterey Bay area (Berkeley, CA: Heyday Books, 1978), 40.

The groups of Indians we call the Ohlone lived between Point Sur and the San Francisco Bay. (Margolin, 1)  They had available to them shellfish, fish, rabbits and other small mammals, birds, eggs, seeds, greens, pine nuts, acorns, and more.  (Margolin, 13-23)

California is geographically and ecologically diverse, so it is unreasonable to expect the entire state to be a land of “inexhaustible resources.”  Yet non-Indian observers who recorded the food gathering and eating habits in various locations found, sometimes to their surprise, a wide variety of items available, even in the desert.

“I cannot pretend to have exhausted the food supply for these Indians, but I have discovered not less than sixty distinct products for nutrition … all derived from desert or semidesert localities …,” wrote David Prescott Barrows when studying the Cahuilla Indians in southeastern California in the late 19th century.  David Prescott Barrows, “Desert Plant Foods of the Coahuilla” in  R. F. Heizer and M. A. Whipple, eds., The California Indians - A Source Book, 2nd ed; rev. ed. (Berkeley, CA: University of California Press, 1971), 306.  He listed honey mesquite, screwbean mesquite (tornillo), various species of Chenopodium (amaranth), agave, yucca, date palms, junipers, acorn, pine nuts, various cacti, and more. (Heizer and Whipple, 308-314)

It is that ecological diversity and the abundance it provided that allowed most California Indians to remain hunter-gatherers.   S. J. Jones, “ Some Regional Aspects of Native California”, in R. F. Heizer and M. A. Whipple, eds. The California Indians - A Source Book, 2nd ed; rev. ed. (Berkeley, CA: University of California Press, 1971), 88-89.  They didn’t require traditional agricultural methods because a generous environment provided a more-than-adequate diet.  (Margolin, 45)  The Chumash Indians of the Santa Barbara area, in particular, were noted for their hunter-gatherer skills: 

They had a technology – the tools and techniques – for collecting, processing and storing these foods efficiently.  And they had a trade network, stretching from the Channel Islands to the highest pine forests, which assured them access to a wide variety of foods all year round.  Because of their success in using the natural environment, they did not plant crops of corn, beans, and other vegetables as so many other American Indians did.  Nor did they raise domestic animals.  They relied, instead, on acorns and other nuts, seeds, roots, bulbs, and leaves from an incredible variety of native plants.  They also enjoyed an abundance of fish and shellfish from the rivers and ocean.  They were skilled at hunting the plentiful wild game:  deer, antelope, rabbits, birds and seals.  Beached whales provided an occasional feast.  Even such small animals as ground squirrels and grasshoppers were trapped and eaten. …

[Food] was usually so plentiful that they had ample time for leisure activities … There was time, too, for religious festivals and for the development of their arts and crafts to the highest standard.  … [The] Chumash were able to go beyond survival, to develop a truly unique and fascinating culture.  Lynne McCall and Rosalind Perry, project coordinators. California's Chumash Indians. (Santa Barbara, CA: John Daniel, Publisher, 1986), 12.

Only the groups who lived in the desert along the Colorado River bottomlands and the south end of the Imperial Valley did any farming, adding corn (maize), pumpkins, and beans to their diet.  Ralph L. Beals and Joseph A. Hester, Jr., “A New Ecological Typology of the California Indians” in R. F. Heizer and M. A. Whipple, eds., The California Indians - A Source Book, 2nd ed; rev. ed. (Berkeley, CA: University of California Press, 1971), 82.

So where the people lived dictated what they ate.  Ralph L. Beals and Joseph A. Hester, Jr. provide a broad classification in “A New Ecological Typology of the California Indians”:

Coastal Tidelands Gatherers
(Estero Bay to the Oregon border)

shellfish, surf fish, acorns, game including deer

Sea hunters and fishers

sea fish, shellfish, game, acorns, sea mammals

Riverine (salmon cultures)

fish especially salmon, acorns, tule, game

Lake

fish, tule, acorns, waterfowl, game

Valley or Plains

acorns, tule, game, fish including sturgeon and salmon, fresh or brackish water shellfish

Foothill

acorns, game, fish

Desert hunters and gatherers

piñon, mesquite, game, a wide variety of vegetable foods

Desert farmers

farm produce, mesquite, fish

(Heizer and Whipple, 74-81)

Their diet was also influenced by the pacing of the seasons: 

During the rainy winter the Ohlones collected mushrooms, and in the early spring, they gathered greens.  Clover, poppy, tansy-mustard, melic grass, miner’s lettuce, mule ear shoots, cow parsnip shoots, and the very young leaves of alum root, columbine, milkweed, and larkspur were all used, some as salad greens, some as cooking greens.  Seaweed was gathered, dried, and used as salt. 

Soon after the spring greens appeared came time for gathering roots.  With their digging sticks the women pried out of the ground cattail roots, brodiaea bulbs, mariposa lily bulbs, and soaproot bulbs. …

Finally, throughout the summer there were berries.  There were berries to cook, to eat out of hand, to dry for later use, or to make into a refreshing cider: strawberries, wild grapes, currants, gooseberries, salal berries, elderberries, thimble berries, toyon berries, madrone berries, huckleberries, and manzanita berries – all of them growing in great numbers.  (Margolin, 50)

This description of the Chumash diet appears to be applicable to any group found anywhere in the state:  “Their diet was broadly based and included virtually every good source of protein and nutrition in the area.”  Bruce W. Miller, Chumash, A Picture of Their World, (Los Osos, CA: Sand River Press, 1988.), 87.  The primary food staples changed according to the ecosystem the people lived in, but they were adept at finding and utilizing the resources available to them. 


My Intent

I will utilize a variety of resources to learn how California native people across the state prepared their foodstuffs:  books, articles, blogs.  One particularly excellent book is Temalpakh, Cahuilla Indian knowledge and usage of plants, by Lowell John Bean and Katherine Siva Saubel.  Lowell John Bean and Katherine Siva Saubel, Temalpakh:, Cahuilla Indian knowledge and usage of plants, (Banning, CA: Malki Museum, 1972; reprint 2003)   It provides a long list of plants and their uses as documented by David Prescott Barrows and other observers of native culture, and the authors interviewed members of the Cahuilla to verify and expand on that knowledge. 

It is also a convenient book as I live in Southern California close to the Cahuilla region, making it easy to venture out to find the plants.  Keeping in mind the hazards of eating plants that have not been correctly identified, I will also utilize A California Flora and Supplement by Philip A. Munz and David D. Keck, which provides botanical keys for accurate identification. Munz, Phillip A. in collaboration with David D. Keck.  A California Flora and Supplement.  Berkeley, CA:  University of California Press, 1973.

Preparation descriptions in my resources vary; some are detailed while others mention only the final product.  If I am unable to find a description of Native American preparation methods for a known food item, I will utilize modern sources that appear to be using techniques comparable to what Native Americans would have had available at pre-contact.  When I acquire the food item, I will try the instructions and write about my experiences.


Wednesday, September 1, 2021

Ranchos - Making Chicos, a Pinedo recipe

On page 57 of Miss Pinedo's book, I found a recipe that described a stew that features a dried corn product called "chicos."  The recipe was simple:  first it described how to make the chicos, then said how to make the stew.

A look around the internet lead me to some New Mexico sites.  Edible New Mexico says this:
Chicos are dried kernels of sweet corn, traditionally roasted in an horno. Once rehydrated, they taste just like the sweetest roasted summer corn you’ve ever had, intensified. This is serious New Mexican food, completely obscure outside of the state, and even many who grew up here have never tried them. I’ve never seen them in a restaurant, but they are worth seeking out. They’re actually listed on the U.S. Ark of Taste, a catalog of outstandingly delicious traditional foods in danger of extinction.

I looked, but I could not find any reference to chicos in the Ark of Taste site.  However, I believe that chicos are probably not well known outside of New Mexico and most likely not well known in that state.  Which is surprising because corn isn't a hard ingredient to acquire.

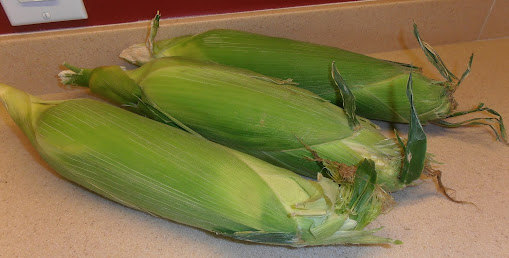
I happened upon a big pile of fresh corn at the market, so I decided to make chicos.

Chicos.

Despues de cocidos los helotes, se ciman y se pone á secar el maiz en el sol. Se guarda en un lugar seco.

Cuaudo se necesita, se toma la cantidad necesaria y se cocina.

Poned el maiz despues de bien cocido en salsa de tomate ó se guisa con chile colorado y queso rallado.


Chicos.

After the corn cobs are cooked, their tops [are removed] and put out to dry in the sun. Store in a dry place.

When needed, take the necessary amount and cook.

Put the well-cooked corn in tomato sauce or it is stewed with red chili and grated cheese.


My Notes

I followed this article for more detailed advice:  New Mexico Nomad, "Chicos".

My three fresh ears of corn were put on a tray into a 170 degree F oven for 10 hours, then allowed to cool in the oven for 2 hours, then on the counter overnight.

Fresh from the market

After slow cooking for ten hours.

After that, I pulled back the husks and removed the silks.

The husks were tied together with a string and hung from a hook in front of a bright window.  This allowed them to get sun and air circulation for drying, and I didn't have to leave them outside to experience the vagaries of nature.

I noticed that the kernels smelled very good.  They were still moist under the husks, and the kernels that were not covered by the husks while cooking had turned a dark brown.

Beginning to dry.


After 2 weeks of drying


Close up of two weeks of drying

I let them dry for two weeks.  I noticed that the kernels were separating and they started feeling harder and not as moist.  They had also turned a more golden rather than bright yellow.

So I let them dry for nearly two more weeks, for a total of about four weeks.  The kernels were noticeably dryer and a deeper gold after that time.

After nearly 4 weeks of drying

The kernels were easily rubbed off the cobs, which I let fall onto a tray.  There were some small membrane-like pieces that joined the kernels.  Most of those I kept in with the kernels.  The rest I could blow with my breath.  I suspect winnowing the kernels in a wide basket would remove this if I really felt the need.

Off the cob

One thing I noticed was a darkened region on the cob below kernels near where the husks attach (on one cob) and on the kernels themselves that were slightly under the husks.  I wondered if it was mold, and I was concerned about eating these kernels.  I kept the ones from the cob because they were the same color as all the others, but left the ones under the husk because they were darker.

Mold?

When I originally translated the recipe, I thought the husks were supposed to be pulled up and tied, but after seeing this I reread what Miss Pinedo had written, "they were topped", and realized that she probably meant the husks were supposed to be removed, as the website I referenced said.  

What I got from these three ears was about 8 ounces of chicos, which I will cook with and report on in another post.

This was so easy to do, I am still surprised that people don't make this at home or that companies don't make it for sale.

Another day I brought home some more, smaller ears and decided to dry them without baking at all.  I pulled the husks off and placed them on a wire mesh basket so air could circulate all around them.  I was surprised that I got some mold on some of the kernels - possibly because they weren't roasted?  The good kernels were small, so they didn't add much to the chicos I had already made.  

Black spots are mold.


Sunday, August 15, 2021

Ranchos - Gallinas estofadas - Braised Chickens, a Pinedo recipe

I am enjoying working my way through Encarnación Pinedo's book, El cocinero español.   

Today I am trying her recipe, "Gallinas estofadas", which is Braised Chickens, found on page 22.  It appealed to me because it puts both meat and fruit in the same dish, which is something I always love.  It also grabbed my attention because while I have put raisins in with chicken (for example, sliced apples, raisins, sliced onions with chicken and the covered with broth or apple juice and sprinkled with appropriate spices), I have never put pineapple in with it.

But pineapple should be something I have done because I love sweet-and-sour chicken at Chinese restaurants and they usually have chunks of pineapple included.  

So here goes!

Gallinas estofadas

Se limpia la gallina, se mecha por todas partes con jamón, ajo y clavo, friéndose despues con manteca y sal en una olla.

En seguida se le echa tomate asado y molido, cebollas chicas enteras, ó si fueren grandes, cortadas en cuartos, dejándose freir :  tambien se sazona, cuando está al fuego, con canela, pimienta y clavo molido, almendras, pasas y piña picada ; se cubre la gallina con partes iguales de vino de Málaga ú otro vino generoso y agua, tapándose despues con una servilleta y una cazuela encima con agua ; se deja hervir la gallina hasta que esté perfectamente cocida y quede el caldillo espeso.

Tambien podrá taparse el guiso con una servilleta y una tapadera apropósito, para no permitir que escape el vapor.

Braised chickens.

The hen is cleaned, it is interlarded everywhere with ham, garlic and cloves, then fried with fat and salt in a pan.

Then a roasted and ground tomato is added; whole little onions, or if they are big, cut into quarters, and allowed to fry: it is also seasoned, when it is on fire, with cinnamon, pepper and ground cloves, almonds, raisins and chopped pineapple ; the hen is covered with equal parts of wine from Málaga or another fortified wine and water, then covered with a wet napkin and a saucepan on top; boil the chicken until it is perfectly cooked and the broth is thick.

You can also cover the stew with a napkin and an appropriate cover, so as not to allow the steam to escape.


My Redaction

2 lb, 5 ounces chicken (in this case, boneless, skinless pieces of thigh meat)

     (or a whole chicken; see notes below)

4 ounces cubed ham

1 tsp. chopped garlic

4 whole cloves

1/2 tsp. salt

olive oil

14.5 ounce can stewed tomatoes, coarsely pureed

8 ounces onion, sliced into bite-sized pieces

1 tsp. cinnamon

1 tsp. ground pepper

1/4 tsp. ground cloves

2 ounces sliced almonds

3 ounces raisins

10 ounces fresh pineapple, chopped or cubed (weigh after peeling)

8 ounces port and 8 ounces water

(more salt to taste when finished)

Remove the vermouth and use port instead.

Cook the chicken, ham, garlic, whole cloves, and 1/2 tsp. salt in a large Dutch oven along with the olive oil.  The chicken should be browned.

Add the tomato puree and sliced onion, and fry some more.

Add the cinnamon, pepper, ground cloves, almonds, raisins, and pineapple.  Mix well.  

Add the port and water, or what amount it takes to cover the mixture.  

Bring to a boil, then immediately reduce the heat so the stew barely simmers.  Cover tightly and allow to cook for 2 to 3 hours or until the chicken is cooked to tender.

Chicken, ham, and seasonings browning

Added the tomatoes and onion

Added the spices, fruit, and nuts

Added the port and water

After simmering for a while.

My Notes

Miss Pinedo recommends using a fortified wine that is sweet.  I thought I wanted to use vermouth (and that is why it is in the ingredients picture).  But once I started assembling the stew, I realized that the strong, herbal taste of the vermouth was not right for this recipe, so I switched to the port, which is also a fortified wine.

It wasn't clear to me if she intended the chicken to be whole or cut up.  Interlarding means mixing or layering, and you can do that with either type.  However I didn't have a whole chicken available, so I used big chunks of the thigh meat.  I liked that it was already boneless and skinless.

The tomato seemed the basis for the sauce, so I felt I was still accurate in using canned, stewed tomatoes.  

It also seemed like a long, slow cooking was appropriate, not only to braise a whole chicken but also to give the sauce a chance to thicken.  Although I did wonder how much wine and water would be needed to cover a whole chicken in a pot!  I believe that if you use a whole chicken, you should use the same amount of liquid I used for the stew so that the meat braises.  

I also wondered how the sauce would thicken considering that you aren't supposed to let the steam out.

The Verdict

It cooked through the evening, then I chilled it overnight and reheated it to serve the next day.

I served with with warmed flour tortillas, which were handy for scooping and holding the stew.  Spoons were also useful.  : )


The meat was cooked just right -- tender, just at the point of shredding.  The big chunks of meat (which I didn't cut up in advance) broke up easily with the spoon.  

The pineapple remained in its cubed state, and added a bright acid bite as well as a little chewy aspect.  The raisins were sweet and the onions tender and mild.  The sliced almonds added a nice crunch.

The sauce was wonderful -- the tomatoes, port, and spices blended together well into a rich flavor that supported all the others.  There was a nice, mild burn from the pepper (freshly ground) and the cloves were not too dominant.  

We both wanted more salt on it, which is why I suggest you adjust the salt to taste at the end.  I thought adding more salt brought out the taste of the spices even more.

My guest taster and I loved it.  We agreed the long, slow cooking was just right to get the meat "perfectly cooked" as Miss Pinedo wanted, and although the broth did not get thick, it did get thicker.  

We had the stew for several meals and enjoyed it each time.  

If I was doing this for a whole chicken, I would baste it occasionally while it was braising.

Success!


Sunday, August 1, 2021

Ranchos - Ante de Camote y Piña, a Pinedo recipe

In the previous post I wrote about making a mamón, a cake that is traditional to the Oaxaca region of Mexico.  Its recipe came from Encarnación Pinedo's book, El cocinero español.

The mamón turned out beautifully and was ready for me to use it in this recipe, Ante de Camote y Pina.  An "ante" is a dessert with a long history - the Encyclopedic Dictionary of Mexican Gastronomy defines it as:

 [An] Old dish made of bread (sponge cake or marquesote) bathed in a mixture of sugar syrup and fruit pulp, and decorated with dried fruits or pieces of the same fruit with which it was made. Its origin dates back several centuries in Spain, but it is not known exactly how long it was prepared. In the sixteenth and seventeenth centuries, certain sweet preparations were made in Mexican convents that were used before the meal; that is why they were called "before". Sometimes they included ground chicken breast. 

Taste and tradition changed over time, and in the second half of the 19th century they were already served after the meal, as dessert. Its name and most of its ingredients were preserved, since they were made mainly from fruits as we know them today. The former sweets for dessert are considered of Mexican origin, because here they underwent many changes and tropical fruits typical of these lands were used. Ante was a very popular dessert in Oaxaca during the 19th and early 20th centuries, but today the tradition is dying out.

Miss Pinedo's book has a whole category on antes, some using apples or apricots, some with milk, and even one with chocolate.  I chose this one because the combination of pineapple with sweet potatoes intrigued me.

Ante de camote y piña  (page 16)

Para una piña se tomarán tres libras de camote que se rayarán o molerán sin dejarles hebra alguna.

A cada libra de estas frutas se le pondrá libra y media de azúcar: Todo se pondrá al fuego hasta que tome punto de pasta, que es el de pegarse al cazo.

Se hará almíbar de medio punto con un poco de vino blanco para rociar con ella el mamón rebanado. Se pondrá una capa de mamón y otra de pasta hasta llegar á la última, la que se rociará con canela en polvo.


Sweet Potato and Pineapple Ante

For each pineapple, three pounds of sweet potato will be taken; they will be finely grated or ground.

Each pound of these fruits will be given a pound and a half sugar: everything will be put on the fire until it takes point of paste, which will stick to the saucepan.

A syrup will be made with a little wine white; sprinkle the mamón with it. Put a layer of cake and another of paste, repeat until reaching the last, the one sprinkled with cinnamon powder.


My Redaction

1/2 pound fresh pineapple (weighed after peeling and coring)

1/2 pound sweet potato (weighed after peeling)

1 1/2 pounds sugar

4 ounces white wine

4 ounces sugar

powdered cinnamon

mamón (see previous post for recipe)

Filling ingredients

Chop the pineapple into small pieces (not pureed), being sure to keep all the juice.

Chop or grate the sweet potato into tiny pieces, about the size of a grain of rice.

Put these in a saucepan (with the juice!) and mix in the 1 1/2 pounds of sugar.

Cook over medium heat, stirring only occasionally, until the mixture starts to thicken, at about 135 degrees F.  Reduce heat as needed to keep the mixture from boiling over.  Remove from the heat when it reaches temperature.

In the meantime, make a simple syrup by mixing the white wine and 4 ounces of sugar together in a small pan.  Cook over medium high heat, stirring constantly, until the mixture becomes clear and begins to boil.  Remove from the heat.

Create the ante by slicing the mamón into 1/2 inch thick pieces and layering them like this:

  • A layer of mamón, with about 1/3 of the simple syrup spooned evenly over it
  • About half of the pineapple mixture spread over the mamón 
  • Another layer of mamón with syrup
  • Another layer of pineapple mixture
  • The final layer of mamón with syrup
Sprinkle the top with powdered cinnamon.  

Let stand to cool and allow the syrup to distribute through the mamón.

My Notes

Since the fresh pineapple I bought was small and weighed about 3 pounds, I decided that the ratio of pineapple to sweet potato should be one-to-one.  I used the food processor to chop the pineapple.  I didn't want it to be too finely chopped as I thought some texture in the fruit layer would be good.

I chopped the sweet potato separately and finely.  Since it was going to be cooked in the syrup and wouldn't necessarily become pureed, I didn't want big, chewy chunks in it.


The pineapple juice initially moistened the sugar and then the sugar extracted more juice.  It didn't take long for the mixture to be wet.


Cooking it over medium high heat got it to boiling quickly.

Then I turned the heat down so it was cooking but not going crazy.

I had to decide how far it should cook.  Should it be taken off the fire as soon as it felt thick?  Or should it cook until it stuck to the side of the pan?  Both of these were suggested in the recipe.  Also, Miss Pinedo's instructions in a different part of the book on cooking syrups like this described the hard ball stage of cooking sugar.  That takes it to about 145 degrees F.  

It started looking thick around 120 degrees F.  It was more sticky at around 135 degrees F.  I took it to 145 degrees F.

It was then I realized this was probably a mistake, as the little bit that had stuck to the stirring spoon set up hard: not break-your-teeth hard but pull-out-your-fillings sticky and chewy.  If it got too cool before I assembled the ante, I wouldn't be able to spread it.  So I worked quickly to put it all together.

First a layer of mamón, then spooned some wine syrup over the top.  Not a lot since she said to sprinkle it.

Mamón only

With the lovely tasting wine syrup

Then I poured the pineapple mixture over it and spread it with a spoon.  I tried to get it to the sides to show off its color against the white of the mamón.

Three layers of mamón seemed right -- not too tall but still interesting to look at and, hopefully, the right proportion of fruit to cake.  When I was sprinkling the cinnamon on top, it got a little out of control and I put on more than I intended.


Ante, first attempt.

I had both filling and mamón left over, so I dissolved the filling in water and recooked it, this time to 135 degrees F.  I made another batch of the wine syrup.  This time I really soaked the mamón with the syrup because I had made a larger quantity:  6 ounces white wine to 6 ounces sugar.  The filling spread well.  I went a little crazy with the cinnamon on top.


Ante, second attempt.

The Verdict

I had three new guest tasters, one of whom had eaten mamón before.  She declared mine "excellent" and said they all liked the ante. 

My two other guest tasters and I tried both versions.  We all agreed on these assessments:

The first version had a crispy mamón and the filling was chewy.  That was good!  The mamón was sturdy enough to stand up to the filling and it was intriguing to have a bite of "cake" that was more like a very light cookie.  The wine syrup made the mamón just a little bit moist and added a floral under-flavor - almost not noticeable but still appreciated.  Having the moisture kept each bite from being too dry or chewy.

The filling had a robust flavor that was mainly pineapple but you could tell it wasn't just pineapple.  So the sweet potato did add flavor and it definitely added texture.  I was surprised it didn't soften when it was cooked, which makes me think that it candied.  I had anticipated it would smooth out and turn the whole filling into a paste.  It was more like a chunky, chewy candy.  I was glad I had chopped the sweet potato into such tiny pieces or it could have been too chunky.

The cinnamon on top was really such a good idea.  It was the perfect accompaniment to all the other flavors.  Whoever thought of that deserves kudos.  

The second version was very different in texture.  Recooking the filling to a softer stage meant it wasn't chewy; it resisted my bite a little but wasn't something I had to chew to eat.  It was more like those cake fillings that are made of fruit and thickened with cornstarch -- moist and firm but not hard.  

Also, I had soaked the mamón with a lot more syrup because I had read that it was supposed to soak up the liquid.  This made a huge difference in its texture -- cutting a bite with my fork, I felt that it was much softer and it made that "moist cake" noise. 

Putting the soaked mamón with the softer filling was a very good idea.  With both of them being softer than the first version, we felt they were well-balanced.  The cinnamon on top was still wonderful.

So both were a success!  If you want crispy, don't soak the mamón too much.  If you want moist, really soak it with the syrup.  Matching the chewiness of the filling is good, too.  

One comment that my two guest tasters made that surprised me was that they both felt it wasn't too sweet.  Why was I surprised?  There is sugar in everything!  But overall, the impression they got was "not too sweet", which they liked.  

If I make this again, I would change the shape of the mamón, making it thin and bigger, like a layer cake round or square.  I liked the three layer effect and the balance of the about 1/2 inch mamón with the thinner layer of filling between.  I didn't like how I had to piece it together to make the layers.  How much syrup would I use to soak the mamón?  I think it would depend on how I felt at the time.  Both the moist and the crispy versions were good.

Don't forget the cinnamon on top!


Thursday, July 15, 2021

Ranchos - Mamones de Almidón, a Pinedo recipe

I've been translating Encarnación Pinedo's 1898 cookbook, El cocinero español.   

One category that caught my attention was called "Ante."  Now that means "before", so I took it to mean it was an appetizer or a first course.  But the recipes described a dessert, and that confused me.  Seven of the eight recipes called for fruit cooked into a thick syrup and put into layers with an ingredient called "mamón".  The eighth called for "bizcocho", which is a biscuit.  I believed from this that mamón was bread or cake.  

A look around the internet first seemed that my hunch was right.  I found a recipe for a chiffon cake called mamon, but it was from the Philippines, and I wasn't sure it was the same thing.  Digging some more, I found that mamón could refer to the Spanish lime, which is like a cross between a lychee and a lime.  It is a fruit that people mostly eat fresh, although it is popular as a juice.  Looking hard at the recipes, I tried to imagine a first course refreshing beverage made with slices of Spanish limes.

But that just didn't seem right. Miss Pinedo lived in Northern California, and Spanish limes don't grow there.  They could have been shipped but the recipes just seem to point to a cake.

I set that question aside and continued to read.  And, guess what?  I found a whole section on mamones much later on in the book.  Yes, I was right, they are cakes or rolls, sweetened and sometimes flavored with anise or sweet almonds.  The word "mamón" means "sucker", because sometimes they are moistened with a sugar syrup which they "suck up" or absorb.  Another name for the mamón is "marquesote", and you can click here to read more about it. (This site is in Spanish but Google will translate it into English.)

To make an ante I needed to first make a mamón, and that is what this post is about.  Come back again for the next post, which will be about the ante.

Here is Miss Pinedo's recipe, as found on page 153 of her book.

Mamones de almidón.

Se baten veinte y cuatro huevos, separadas las claras de las yemas, hasta que se pongan duras.

Aparte se mezclan con las claras dos pozuelos de azúcar en polvo, y estando bien incorporada, se le añadirán las yemas, revolviendo todo cerca de la estufa, vaciando en el batido diez y ocho onzas de almidón de maíz: se seguirá batiendo con una mano mientras se le pone con la otra el almidón, para que no forme granos. Tan luego como todo esté incorporado, se vaciará prontamente en las cajas, que solo se llenarán hasta la mitad para ponerlas á cocer en un horno suave.


Starch Mamones

Twenty-four eggs are beaten, the whites separated from the yolks, until they get hard.

In addition, two cups of powdered sugar are mixed with the whites, and then the yolks are well incorporated, stirring everything near the stove, then empty into the batter eighteen ounces cornstarch:  continue beating with one hand while putting the starch in with the other, so that it does not form lumps.   As soon as everything is incorporated, it will be promptly emptied into the boxes, which will only be filled halfway; put them to cook in a soft oven.


My Notes

I didn't know this technique, so I looked around the internet.  Click here to see the video that helped me understand what to do.  I used the quantities in this video so I didn't have to use 24 eggs.  Note that I used powdered sugar as Miss Pinedo specified.

Redaction

5 eggs, separated

300 grams cornstarch

180 grams powdered sugar

Preheat the oven to 300 degrees F.

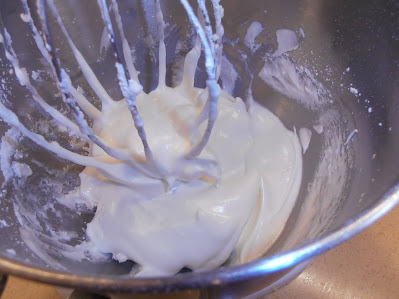
Beat the egg whites until stiff.

Add the powdered sugar in batches and mix it well into the egg whites, using a low speed on the mixer and stopping the scrape the sides as needed.  

Add the yolks, one at a time, incorporating each one well before adding the next.

Then add the cornstarch, a big spoonful at a time, incorporating it well before adding the next and stopping to scrape the sides as needed.

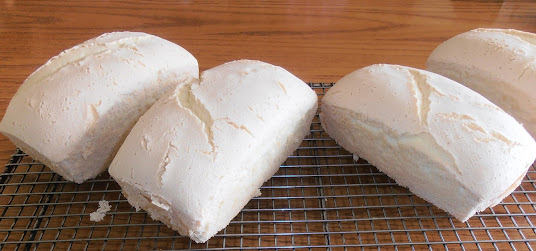
Once the batter is done, pour it into pans.  I chose to use four tiny loaf pans because I thought that shape would be best for the ante.  Each pan was ungreased and filled about halfway.

The pans went onto a bigger pan so they could all be handled at once.  

They baked for 40 minutes, until a pick inserted into the middle came out clean.

I let them cool in their pans on a wire rack until I could easily hold them, then I slid a spatula around the sides.  They all popped out easily.  They finished cooling on the rack.

Egg whites plus powdered sugar

And now with the yolks

The batter has the cornstarch and the pans are half full.

Fresh out of the oven!

Final cooling

A close up.

The Verdict

I sliced one loaf into 1/2 inch wide pieces lengthwise.  The texture was perfect:  uniformly tiny holes, no part was too dry or too wet.  The exterior was just a little darker than the interior -- not over- or undercooked.

I tasted one.  As a cake, it left something to be desired.  The mouthfeel was more pasty than I expected, and rather dry, and the flavor was almost not there.  I suppose that was to be expected as it was just cornstarch, sugar, and eggs.  I think my mouth was expecting a moist piece of cake and this wasn't it.

But I knew how it was to be handled for the ante, so I consider it a success.  Tune in to the next post to see how the ante turned out.